Minesweeper clone in HTML5

In my two previous block entries I wrote about one possible ways to do simple Slots and Car games on HTML5 technologies. This writeup combines some of those methods and introduces new ones to implement Minesweeper game with a twist.

mine

This game is actually “reverse” minesweeper, or should we say Applesweeper. Players mission is to find all the apples without clicking on of the empty tiles. Score is increased when player finds an apple and is decreased when he misses. Game ends when all the apples are found.

Try out the game here: http://ikonen.me/examples/mine/

As in previous games, hud is a html div, and the game grid is drawn on a canvas. Grey slab that hides tiles content is procedurally generated on offscreen canvas at the startup.

this.slab = document.createElement('canvas');
var ctx = this.slab.getContext('2d');
this.slab.width = this.resolution;
this.slab.height = this.resolution;

ctx.fillStyle = 'grey';
ctx.fillRect(0, 0, this.resolution, this.resolution);

ctx.beginPath();
ctx.fillStyle = 'white'
ctx.moveTo(0, 0);
ctx.lineTo(this.resolution, 0);
ctx.lineTo(this.resolution, this.resolution);
ctx.lineTo(0, 0);
ctx.closePath();
ctx.fill();

ctx.fillStyle = 'lightgrey';
ctx.fillRect(4, 4, this.resolution-8, this.resolution-8);

The this.slab holds off-screen canvas that contains the generated slab image.

Game area size and number of apples are function of screen size, to adapt to different screensizes.

var width  = window.innerWidth;
var height = window.innerHeight;

GRID_W = Math.min( 12, ~~(width / GRID_RESOLUTION));
GRID_H = Math.min( 12, ~~(height / GRID_RESOLUTION)) - 1;
var APPLE_COUNT = ~~((GRID_W * GRID_H) / 8);

For example, Here is the game on iPhone 3Gs.

mine_iphone

Game main loop is passive, when user clicks on the screen click handler sets the location on object that holds the clicked tile x and y coordinates

$('#container').click( function( e ){
    var p = $('#canvas').offset();        
    game.click = {
        x:parseInt((e.pageX-p.left)/game.resolution),
        y:parseInt((e.pageY-p.top)/game.resolution)};
    }
);

Main update handler is called on each frame and it checks if button has been clicked and updates the grid and redraws it if required. Grid is simple array where x and y are mapped as position.

Game.prototype.pos = function( x, y ) {
    return y*this.width+x;
}
Game.prototype.xy = function( pos ) {
    return {
        x:parseInt(pos%this.width),
        y:parseInt(pos/this.width)
    }
}

Grid array values are integers where content is bit masked. Higher bits are used to flag if grid location has slab and apple, empty or number.

var SLAB_MASK = Math.pow(2, 16);
var APPLE_MASK = Math.pow(2, 15);

// grid location (5, 6) has slab and number 3
var pos = this.pos(5, 6);
this.grid[pos] = 3;
this.grid[pos] |= SLAB_MASK;

The slab is removed from location just by negating it

this.grid[pos] &= ~SLAB_MASK;

Draw loop just checks for each position and checks with mask what it contains

for ( var y=0; y < this.height; y++ ) {
    for ( var x=0; x < this.width; x++ ) {
        // Draw each tile
        var s = this.pos(x,y);
       if (s & SLAB_MASK) {
          // Still covered tile
         this.ctx.drawImage( this.slab, x * this.resolution, y * this.resolution )

       } else if (s & APPLE_MASK) {
         // Uncovered apple
         this.ctx.drawImage( tile, x * this.resolution + 2, y * this.resolution + 2 )
       } else if (s > 0) {
         // Neighbour number
         this.ctx.fillText( '' + s ,
                            x * this.resolution + this.resolution/2,
                            y * this.resolution + this.resolution/2)
       }
    }
}

When player clicks on empty tile, recursive function walks through the grid clearing slabs from adjacent empty tiles.

function _empty( x, y, force ) {
    if ( x < 0 || x >= that.width || y < 0 || y >= that.height ) return;

    var pos = that.pos(x, y);
    var d = that.grid[pos];

    if (d && (d & SLAB_MASK) && (force || !(d & APPLE_MASK))) {

        that.grid[pos] &= ~SLAB_MASK; // clear out slab

        // Clear next neighbor if this is empty tile
        if (that.grid[pos] == 0) {
            _empty(x, y - 1) // north
            _empty(x, y + 1) // south
            _empty(x - 1, y) // west
            _empty(x - 1, y - 1) // north west
            _empty(x - 1, y + 1) // south east
            _empty(x + 1, y) // east
            _empty(x + 1, y - 1) // north east
            _empty(x + 1, y + 1) // south east
        }
    }
}

Code is available at GitHub.

Car Game on HTML5

This is continuation to my previous blog post, that discussed how to make simple Slots machine with HTML5. The basic principle in this driving game demo is similar, but in addition to that it adds dynamic graphics using canvas.

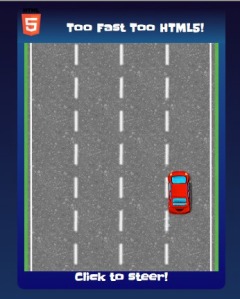
HTML5 Drive

Try it out here: http://ikonen.me/examples/drive/

Game road is div with background image that is translated down and back up to create illusion of moving road. This same method is used in Slots machine.

Car spritecar2

Cars are drawn on canvas on top of the road so while road moves cars appear moving forward. Each click starts moving the player car from current point to the click point using smooth  Bezier curve. Car acceleration is increased or decreased depending on click location. Player car also has smoke plume animation which intensity depends on acceleration.

function _bezier_quad(t, p0, p1, p2) {
     return {
         x: (1 - t)*( (1 -t) * p0.x + t*p1.x) + t * ( (1 - t) * p1.x + t * p2.x),
         y: (1 - t)*( (1 -t) * p0.y + t*p1.y) + t * ( (1 - t) * p1.y + t * p2.y)
     }
 }

After car has travelled long enough, the update loop starts slowing down road speed and moves in sync  div that holds Finish text and flags.

finish

Collision detection is done on each update. In case player hits on other cars, the other cars may blurb random bubbles that are added as normal div elements with rounded borders. Element location is updated based on car location.

bubble

In collision both cars are bumped so player can make room by hitting to other cars. Game loop is run by animation frames, so it stops if browser window goes in background. This is not optimal but makes implementation simpler. Better option is to run update with setInterval and draw on animation frames.

...
    var that = this;
    (function gameLoop() {
        that.clear(); // clear canvas objects
        that.update(); // update game state
        that.draw(); // draw game
        requestAnimFrame( gameLoop );
    })();
...

Update and draw in separate loops. This is better solution for complex games because browser will always call setInterval callback but requestAnimFrame callback only if browser window is visible and active. Callback is not executed if browser window is minimized or it’s tab is on background. If you rely only on requestAnimFrame the game is paused on background.

    var that = this;
    setInterval(function() {
        that.update(); // update game state
    }, 1000/30); // 30 frames

    (function gameLoop() {
        that.clear(); // clear canvas objects
        that.draw(); // draw game
        requestAnimFrame( gameLoop );
    })();

Game code is available in GitHub.

Simple Slot machine game using HTML5 Part 1: Basics

UPDATE: See also Simple Slot machine game using HTML5 Part 2: Audio.

Here is overview on how to make simple Slot machine with HTML5. This demonstrates the basic structure of HTML5 game and how to use dynamically created graphics.

Slot machine has typically reels with images and player just initiates the action and waits until reels stop. 1 or more in single line usually determine the winning condition. In this game player wins if he or she gets more than one gold bar in row.

Here is view of the game.

Slots machine

You can try it out here http://ikonen.me/examples/slot/.

How it works

Slot machine is a single HTML page that includes the game code, webfont and jQuery. When loaded it runs SlotGame() function that initializes and runs the game.

HTML page has 3 narrow and tall HTML5 canvases, these are the reels. They are located inside div container “reels” that shows only a limited window at any time, hiding the rest of the canvases.

<div id="reels">
   <canvas id="canvas1" width="70" height="300"></canvas>;
   <canvas id="canvas2" width="70" height="300"></canvas>;
   <canvas id="canvas3" width="70" height="300"></canvas>;
</div>

On initialization, game preloads the 6 image assets. Preloading is simply done by creating Image object for each asset and listening its load event. Preloading is required, because otherwise game could not draw the reel canvases on initialization.

img = new Image()
img.src = "img/someimage.png"
img.addEventListener("load", function() {
   // image loaded
});

Game draws the pictures in random order on each canvas reel with shadow and slot separator bars.

ctx.save();
ctx.shadowColor = "rgba(0,0,0,0.5)";
ctx.shadowOffsetX = 5;
ctx.shadowOffsetY = 5;
ctx.shadowBlur = 5;
ctx.drawImage(asset.img, 3, i * SLOT_HEIGHT + IMAGE_TOP_MARGIN);
ctx.drawImage(asset.img, 3, (i + ITEM_COUNT) * SLOT_HEIGHT + IMAGE_TOP_MARGIN);
ctx.restore();
ctx.fillRect(0, i * SLOT_HEIGHT, 70, SLOT_SEPARATOR_HEIGHT);
ctx.fillRect(0, (i + ITEM_COUNT)  * SLOT_HEIGHT, 70, SLOT_SEPARATOR_HEIGHT);

The reels are not redrawn after this, but when moving they are simply translated with CSS3 transform downwards and when they reach threshold they are moved back to beginning. Threshold and reset offset is selected so that after the reset images are shown on same locations. This creates illusion of constantly rotating wheel. This is why images on borders are twice in the reel, so we avoid showing canvas bottom or top in any situation.
Click ‘Toggle Reels’ button on top left corner of the game page to toggle the reel visibility while it’s spinning, seeing reels in action makes explanation above much easier to understand

Here is image where reel container overflow is set to visible.

Reels

Game loop is simple, it starts when player clicks ‘Play’ and runs on every animation frame updating the reel locations based on game state and “draws” them on screen, or actually as explained earlier just translates their locations. Result is predetermined on each roll start and when each reel stop, its locked on the correct image. Update loop tries to make this when correct image is close to this location, so the jump is not too abrupt (see function _check_slot in slot.js for details).

Each browser has still different name for the transform so initialization code determines the correct CSS name and if browser has hardware accelerated 3d version.

this.vendor = 
  (/webkit/i).test(navigator.appVersion) ? '-webkit' :
  (/firefox/i).test(navigator.userAgent) ? '-moz' :
  (/msie/i).test(navigator.userAgent) ? 'ms' :
   'opera' in window ? '-o' : '';

this.cssTransform = this.vendor + '-transform';
this.has3d = ('WebKitCSSMatrix' in window &amp;&amp; 'm11' in new WebKitCSSMatrix())  
this.trnOpen       = 'translate' + (this.has3d ? '3d(' : '(');
this.trnClose      = this.has3d ? ',0)' : ')';
...
$('#someelement').css(this.cssTransform, this.trnOpen + '0px, ' + '-123px' + this.trnClose);</pre>

Complete code is available on Github.

Continue to Simple Slot machine game using HTML5 Part 2: Audio